Sunday, December 11, 2011

Eating on Adventure: London, Dublin, Edinburgh

London!


Thanks to an awesome friend working in London, I recently returned from a 10-day UK adventure through London, Scotland, and Ireland. (It was incredible!) In addition to 14 powerbars, a bag of almonds, some prunes, a handful of fruit leather strips, a batch of chocolate almond butter cookies, some fruit, and a bag of protein shake, I was lucky enough to run into some pretty decent whole food restaurants abroad.  In particular, I ate at one raw restaurant (SAF London), one deli/bakery (Blazing Salads, Dublin), and munched a lot of wild blackberries along the road!  Otherwise, I only actually bought two additional meals- one grilled-fish and chips meal, and one potatoes and vegetables meal-- both in Ireland during day tours.

My thoughts on the food that I did find--


 1. SAF Shoreditch - City of London - http://www.safrestaurant.co.uk/
     my score: 4 / 5 stars

This is not aubergine manicotti. I found it online when I googled SAF. But it does look like the raw tacos that my companion ate!

I ordered the Aubergine Manicotti (£14.45): "Mixed herb cheese wrapped in marinated aubergine strips, dehydrated and served with putanesca, olive relish and semi-dried tomato."

It was good! Not the best raw food I've ever eaten (which would be the Present Moment Cafe in St. Augustine, FL), but still very much worth it. Even more telling, SAF passed the ultimate test: my sugar-and-meat-and-all-things-normal eating friend even enjoyed his raw tacos. Not bad!  The biggest downside to SAF was its distance from where I was staying in Central London. (It was about a 20 minute walk)

Oh- oh- and for DESSERT, I ordered a orange chocolate tart. It was also fair. A little too cacao-nib-y for my taste, but what redeemed it was the little orange-flavored spheres that topped it. Very molecular-gastronomy-y, and I don't remember what they're actually called... but cool!


2. Blazing Salads: Dublin, Ireland
    5 / 5 stars

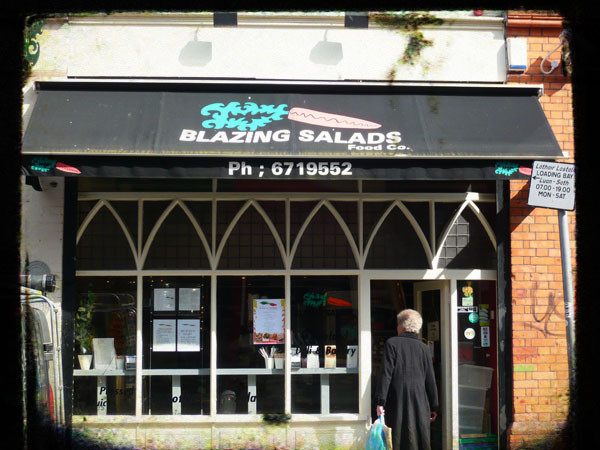
Image from The Vegan Post.
 This place was possibly the highlight of Dublin for me! It is a small family-owned deli, with a salad bar and bakery. The bakery was full of sugar-free, gluten-free, dairy-free concoctions! I stocked up for the next few days worth of meals/snacks and purchased: a brown rice ball stuffed with beans, a phyllo-esque wrap stuffed with nori/seaweed, an orange-date bar, and a cardamom-fig pastry roll. And then I figured what-the-heck, and added some Natasha's raw chocolate truffles for 1 euro each.  Everything that I had there was unique and delicious-- 100% worth the experience!  And of course it was a great way to blow my last euros before returning to London.


I was even so happy to find delicious, edible Dublin food, that missing my flight back to London didn't even upset me too much that evening. Because yes, that happened... silly AM vs PM confusion. But, 200e later, I was on a different flight nonetheless.


So, in summary- there exist places to eat abroad on a gluten free, sugar free, dairy free diet-- you just have to do your homework and know where to go. And if ever you are in Dublin, be sure to hit up Blazing Salads, on Wicklow St.

Wednesday, November 23, 2011

Maple Walnut Pie


One again... ate 90% of it before a photo could be taken..... :)

Happy Thanksgiving! This is a festive pie that I actually made for a pre-Halloween pumpkin carving party.  It was delicious, and I liked that it was less traditional than your typical pecan pie. (and also... walnuts are cheaper than pecans! :) )


Crust:

1/2 c + 3 tbs millet flour
1/2 c garbanzo bean flour
1 tbs potato starch
1/8+ tsp salt           ---> combine dry ingredients
3 tbs ghee              ---> mix into dry ingredients to make velevety consisitency
3 tbs ghee              ---> mix coarsely to form pea sized balls
~1 tbs ice-cold water   ---> drizzle in, gently mixing until dough forms into a ball

Roll out for a 8.5" pie pan (8 or 9" would work too) on waxed paper. Place the pie pan upside-down on the rolled dough, and use the waxed paper to flip the crust into the pan. Repair any cracks that may form, then crimp edges
Prick bottom and sides of pastry with fork. Line edges of crust with double thickness of foil. Bake 8 minutes at 450 F.. Remove foil, them bake 5 minutes more or until crust is lightly browned cool. Reduce oven to 350 F.


Filling:


1.5 c maple flavored agave (or maple syrup, if you can eat it)
3 eggs
4 tbs ghee
2 tbs coconut oil
1/3 c coconut sugar
1/4 c erythritol (or more coconut sugar)
2 c chopped walnuts, toasted
1 tbs vanilla
1/4 tsp nutmeg
2 tsp tapioca flour


Beat eggs until thick and lemon colored, ~5 minutes. Add ghee/coconut oil (softened), beat in. Add all other ingrdients and mix, then fold in walnuts. Pour into crust. Bake on baking sheet for ~45 minutes, or until middle just begins to set but edges are not burned. If edges seem to be cooking too quickly (browning) before middle begins to set, turn temeprature down slightly.  Cool before serving.


Tastes like a cross between a pecan pie and maple stick donuts. :)

Wednesday, November 2, 2011

New Rainbow Light Shake?

What's the deal with the new Rainbow Light Chocolate Protein Energizer?


I'll tell you what the deal is.  They increased the price by four dollars at my regular supplier, Vitacost. This magic is now over a dollar a scoop.  And you know what else they did? They reduced the scoop size. A pouch that used to have 14 110-calorie large-sized scoops now has 14 88-calorie small-sized scoops.  Fourteen over-a-dollar-each 88 calorie small-sized scoops.

And you know what else they did?
Well, they did improve the flavor. I was never critical of the old taste- especially since I always choose to eat my protein shake as pudding-consistency, with way less water than usual. This makes the taste more concentrated, and that's just fine with me!

But I immediately noticed a new creaminess about this latest pouch of Rainbow Light that I opened. And it was good! Almost like genuine chocolate milk- but not to worry- it's just as allergen free as before. The only difference I noticed was that "Custard Vanilla Flavor" has been added to the "other ingredient" list.

Way to go, Rainbow Light- you invented Custard Vanilla Flavor, and it tastes like chocolate milk.  But is it worth a 36% price increase per pouch?


(PS I've been sprinkling this new formula over my granola in the morning... mmMMmm!)

Monday, October 31, 2011

Apple Cider Donuts with Apple Cider Syrup

MmmMMmm... pre glazed.

Perfect for the fall.  TRUTH: I ate 48 mini donuts in 3 days.  Pretty easy to make, and the result has a true cake donut crumbly-but-melt-in-your-mouth consistency.  Top them with cinnamon coconut-sugar, or drizzle with home made apple cider syrup.... or both!


 THE RECIPE:

1/3 c brown rice
1/3 c teff flour
1/3 c tapioca Flour
1 c millet flour            (totals 2c GF flour)

1 tsp guar gum
1 tbs baking powder
½ tsp salt
½ tsp nutmeg (or more to taste)
½ tsp cinnamon (or more to taste)

2 tbs applesauce
¾ c apple juice
5 (/7, or scant ¼ tsp) drops apple cider vinegar
3/4 c coconut sugar          
2 tbs agave
2 tbs coconut oil, melted
½ tsp vanilla extract
1 egg

Combine dry ingredients. Combine wet ingredients. Make sure coconut oil is melted—place in hot water bath/heat gently on stove if not. Mix wet into dry.

Preheat donut maker; fill donut wells—DO NOT overfill, these WILL rise well. To top, spray with sprayable coconut oil, then sprinkle with cinnamon+coconut sugar. For a sweeter taste, drizzle with apple cider syrup (and cinnamon-coconut sugar, if desired). The syrup does take away a bit from the delicate donut taste, though - so take your pick!


Apple Cider Syrup:

1 gallon apple cider

First, measure 2.5 cups cider into a large (at least a gallon) pan, and note the liquid level. Add the rest of the cider. Boil for approximately 5 hours, stirring frequently (especially at the end as it thickens), until volume is reduced to 2.5 cups. Pour into sterile (boiled) glass jars for storage. Keep refrigerated. Syrup will thicken as it cools.

Boil it down!
As it begins to thicken (~5 hrs) it will begin to froth! Exciting!


Monday, October 3, 2011

Garden Tilapia


What I'm eating NOW!
No, this fish isn't from a koi pond-- but the fresh herbs are from my backyard garden. This is a fast, easy, and satisfying meal that I've been eating quite frequently lately!

THE RECIPE:

1 fish fillet- I recommend tilapia
~ 4 large fresh basil leaves
~10 fresh lavender leaves
1/2 tsp capers (~6-10)
~1/2 tsp lemon juice
~1 tbs extra virgin olive oil
salt
pepper
garlic powder

Warm olive oil in skillet over medium heat until just hot enough-- "enough" = when an herb thrown in sizzles. While it's heating, roll lavender into basil and chiffonade. Add a dash of salt.  Place fish fillet (thawed) into oil. Sprinkle lightly with salt, pepper, and a dash of garlic powder. Throw in herbs. Dump in a bit of lemon juice. Cook until fish has turned mostly opaque (the center can still look a bit raw), then flip. Sprinkle on capers. Cook for a few more minutes, then eat! Use the herb-infused oil as sauce. :)


Sunday, September 11, 2011

Dark Chocolate Ribbon Fudge


In addition to being delicious, this fudge is incredibly flexible when sliced into thin strips. The sculpting possibilities are endless, but of course I ate it all before getting around to shape more than a simple spiral. I also added raspberry sauce, home-made with raspberries from my back yard.

THE RECIPE:

1/2 c coconut oil
8oz unsweetened baking chocolate
1/2 c agave + small dump (~2 tbs)
1 c coconut sugar
1/3 c cocoa powder
1 tsp vanilla
1/8 tsp sea salt (or, to taste)

Line a 8x8 baking pan with waxed paper.

Use a double boiler to prevent chocolate from burning. Before pan is hot, add all ingredients except vanilla and sea salt.  Turn heat on to medium, and stir continuously until chocolate is just melted, and all ingredients are combined. Do NOT overheat. Then add vanilla and salt, stir to mix.

Pour fudge into lined pan, and set in fridge to cool. (Takes about 2 hours)

After the fudge has set, when it is left out of the fridge for a few minutes, thin strips will be very flexible- hence, it's "ribbon fudge!"

Also-- RASPBERRY SAUCE
THE RECIPE:

~2c raspberries
~1/4 c orange juice concentrate
agave - to taste

Bring all ingredients to a boil and mix. Let cool, and keep in fridge.

Tuesday, August 30, 2011

Coconut Shrimp: Gluten Free, Lectin Free*


 * I don't really know what a Lectin is. I just know I'm not supposed to eat them right now. I also know that shrimp, coconut, and olive oil are all on my "OK" list, and therefore do not contain significant amounts of lectins.

So, I've pretty much been in a food funk since the start of my new anti-leaky gut diet restriction, BUT this recipe kicks ass because it's the only thing I've been inspired to make-- AND it's absolutely delicious.  I've been making it for dinner on Fridays, then finishing it up for brunch over the weekend.

THE RECIPE:

raw shrimp, peeled and deveined, (tail on is ok)
3 tbs coconut flour
3 tbs shredded unsweetened coconut
pinch salt
smaller pinch pepper
coconut oil and/or extra light olive oil, for frying

Combine coconut flour and coconut in equal parts in a bowl. Add salt and pepper to taste. Heat a frying pan / skillet with enough oil to cover bottom of the pan, over medium heat. Throw a couple shrimp in the bowl of breading materials, and toss to coat. (Optionally, you can dip the shrimp in egg first to help the breading to stick.) When oil has heated, place breaded shrimp into pan- they should sizzle and begin to fry!

When the shrimp turns from clearish blueish (uncooked) to look whiteish pinkish (cooked), flip each to brown the other side. Remove when the breading on this side is golden brown. Keep cooking until you've used up all your shrimp- make sure that there is oil in the pan at all times, since this helps conduct heat into the shrimp PLUS adds deliciousness. If the oil gets "dirty" with bits of burned breading, wipe out the pan and heat fresh oil to continue.


Tuesday, August 16, 2011

The Results are In...

So, about a month ago I started working with a new functional medicine doctor to have some comprehensive tests done, and figure out just what exactly my deal is. I needed to reevaluate my health plan.

The results came in last weekend, and weren't all-together unexpected. Nevertheless, I'll be on an even more restricted diet for the next month, as I eliminate all lectin-containing foods as well as the usual sugar, dairy, and gluten. This means no soy, beans, eggs, nightshades, etc... -- when life gives you lemons, grab the stevia!  Expect some crazy posts to come, including darkdarkdark chocolate fudge, and possibly coconut yogurt (I can eat fermented things now! the only good diet-news!)

So, the official results:
1. Leaky Gut Sydrome - tight junctions between cells in intestines leak, letting undigested large molecules through the Basesment Membrane Zone into my bloodstream.. triggering autoimmune reactions.

Leaky Brain - same thing can happen in the brain. Sounds scary, huh?

2. Gluten Intolerance - yes, no wheat for me. Also, no wheat for me in shampoo, lotion, toothpaste, etc.

3. Foods that Imitate Gluten - include Dairy, Rye, Barlet, Spelt, Yeast, Oats, Coffee... avoid those too!

4. Auto-immune attack on Thyroid and Pancreas -- hopefully fixing up my diet, fixing the leaky gut will let my body chill out a bit so this goes away too.


Basically, that's the situation- and really, it's not too bad. The only food I really had a bad reaction to in blood tests is gluten. Right now I'm focusing on a lectin-free diet to heal my gut and stop the leakiness!

I'm on day 3, and (although I don't want to get my hopes up) I honestly had shockingly normal energy levels today! AND didn't even wear my bloating-proof fat pants to work the last two days. Awesome!

Monday, August 1, 2011

Golden Snitch Snack Balls

I open at the close.......
As I'm still behind in my posts, I made these in honor of the opening weekend of the Deathly Hallows, Part II, and ate them for lunch before heading to the theater to watch the show (complete with Dark Mark on arm.)

What did I think of the show? As with all of the HP movies, it wasn't quite as good as the book, and certainly botched a few key moments (like Neville's heroic moment! ...fail) but overall it was quality entertainment... and, succeeded in making me tear up on multiple occasions. I really lost it at the end when Harry, Ron, and Hermione were all grown up, sending their own kids off to Hogwarts. When I met the Harry Potter franchise, Harry was younger than I was-- and now all of a sudden, he was an adult, married, with children, and the magical saga had reached its conclusion. If Harry had grown that much over the years, where does that put me?

Sentimentality aside, these snitch balls are a super easy way to have a magical lunch.

THE RECIPE:

mozzerella soy cheese
Peeves, my first favorite character.
flaxseed meal

Snitch filling:
1/2 avocado
2(or more) fresh basil leaves
2(or more) spinach leaves
dash of salt                              ---> pulse in Magic Bullet until leaves are chopped and a paste forms

Roll in flaxseed meal to form a "golden" ball. ****
Slice soy cheese, and cut slices into matching diamond shapes. Stick into ball to form wings of the snitch.

Place mouth on snitch and let it "open at the close" ....of your mouth. As it explodes in flavor and awesomeness.

**** Really want to take it to the next level? Put a whole hazelnut inside to replicate the Ressurection Stone.

Luna Lovegood, my other favorite character (that's MEE!)
BONUS: take the Harry Potter Comprehensive Sorting Test HERE and let me know what you get!
(I'm an all-out Ravenclaw :) )

Sunday, July 31, 2011

Magic Cookies Bars


Magic! (cookie bar)


Magic cookie bars (also known frequently as Seven Layer Bars-- although I'm nver quite sure what the 7th layer is... maybe the pan?!) are one of the first desserts I learned to make by myself. The original recipe came from an EagleBrand Sweetened Condensed Milk can. I remember layering the graham cracker crumbs, melted butter, sweetened condensed milk, chocolate chips, walnuts, and coconut flakes on many a late-night dessert-making spree, often accompanied assisted by friends, and often followed by gobbling up the whole pan while watching movies and gossiping in my basement.


Fast forward to now, and my current recipe is really just as easy to make and just as delicious to eat. (I may or may not have eaten it for breakfast all week... which actually worked great!) Benefit over the traditional version: no crushing graham crackers. Downside: spreading marshmallow fluff is a pain. Either way, they're still easy and worth it.


MmmMmm, pan of gooey deliciousness...

THE RECIPE:

Layer in a baking pan: (8x8, or 9x13)


Uncooked.
crust, in 2:2:1 ratio - almond meal, flaxseed meal, coconut sugar
melted coconut oil - add to crust, mix with fork until consistency is gooey but not wet, and covers entire bottom of the pan
vegan marshmallow fluff (I get mine at WholeFoods) - spread (or rather, lump/drizzle on) until it more-or-less thinly covers the whole pan
chocolate chips - use ~10 oz to cover the whole area
chopped walnuts - again, sprinkle or spread over surface
shredded coconut - sprinkle over surface


By now the chocolate chips, walnuts, and coconut should have entirely covered the gooey fluff layer-- thus, you can use your hands to gently press all along the top layer to compact the layers together. 


Heat oven to 350 and bake until chocolate is melted and coconut begins to toast - around 20 minutes.


Cooked, served, half-eaten.


Wednesday, July 27, 2011

Tapas Espanolas


Mmm Tapas! What are tapas, you may ask? Well. Let me tell you a little story.

Once upon a time, I spent a summer abroad in Granada, Spain. I stayed with a Senora who made the most delicious crepes; walked two miles a day in dizzying heat, skinnydipped in Nerja, hiked los Cachorros, tasted chocolate croissants from every pasteleria in town, watched the sun rise over the Alhambra from club Camborio, tried late-nite shawarma post-Chupiteria 69, learned the difference between "de puta madre" and "puta madre," and of course, went for tapas (or, "tapateando").

Tapas are snacks sold at bars in Spain, and usually of the deliciously greasy bar food variety. One of the highlights of Granada was that at most bars, with your first drink you got a free tapa. To go "tapateando" takes advantage of this-- we'd go out for tapas instead of dinner, bar-hopping from place to place, ordering a drink at each one and getting the free tapa that comes with it. The fun part, of course, is that one generally ends up getting drunk before getting full in the process.  (Did I mention I first got really sick after returning from Spain that summer? Wonder why.)

Some notable tapas that I encountered in my journeys:

Tortilla - the Spanish tortilla is a thick, dense omelet with potatoes and onions mixed in
Croquetes - Fried blobs filled with mystery ingredients! (cheese? meat? who knows!)
Berenjena Frita con Miel de Cana - fried eggplant with sugarcane molasses

Espinacas con Garbanzos - sauteed spinach with garbanzo beans; I think I first encountered this in Sevilla last year, and it was a nice "healthier" alternative at the time.

and, on the other hand, I once received little bread slices topped with an inch of may, sprinkled with bacon bits. TAPA FRACASO! (= tapa fail!)

 And, what to drink with said tapas? My personal favorite was the Shandy- beer mixed with lemon soda. If the place didn't have Shandys, then tinto de verano (red wine mixed with lemon soda) was the way to go-- or, a good old sangria. (Or there was that one bar that had their specialty "orgasmo" mystery drink...)

But alas, the days of Shandys and shawarma and guitar-clapping, sangria-sharing are over.
But that doesn't mean I can't make my own healthy tapas!

Here are the (only slightly gringo-ified) diet-acceptable versions of three of my favorite tapas:
(and sorry for inexact (/nonexistant) measurements 0:)

Espinacas sin Garbanzos  (make it "con" garbanzos by throwing some in- I was lazy!)

Spinach!
Paprika!
Salt, white pepper!


Tortilla Espanola -- here, the idea is that you want enough egg to nearly fill whatever pan you're using. This time I made a tortilla-for-one and used a little baby 6-inch(?) "one-egg" pan:

2 eggs
1/4 - 1/2 boiled potato, thinly sliced -- officially these slices would be fried first with some chopped white onions -- or use leftover french fries. (I used leftover baked home-fries)
dash of onion powder (or chopped, sauteed white onion)
salt
white pepper
little dump of Spanish olive oil (/EVOO)

Mix all ingredients in a measuring cup. Heat pan with a dash of olive oil. Pour in mixture and cook until set. (To be honest, I haven't mastered the art of cooking a perfect tortilla... mine has ended up a bit mishapen!) Cook until set and slice into wedges.

Berenjena Frita con Miel de Agave
eggplant, sliced into ~1cm rounds
almond meal / flaxseed meal
salt, pepper, coconut sugar
agave


Slice eggplant; coat each slice in almond meal (or just sprinkle it on top). Arrange slices on a cookie sheet. Spray with olive oil cooking spray, sprinkle on salt and pepper to season, and optional coconut sugar, if desired. To serve, drizzle agave nectar on top.

Tuesday, July 26, 2011

BBQ Sauce


I forgot to take a picture of this sauce or the chicken on which it was barbecued, so instead you get random BBQ flames.

Also, I'm pretty behind in posting, since I made this for the 4th of July. My dad grilled the whole family's chicken with this sauce, and everyone loved it!


THE RECIPE:

2 tablespoons olive oil
3 cloves garlic, crushed
¼ cup green onions, minced
2 whole tomatoes, pureed
1/4 can frozen concentrated orange juice (or ~1 c fresh)
2 tablespoons apple cider vinegar
½ teaspoon dry mustard powder
½ teaspoon paprika
1 teaspoon salt
¼ teaspoon black pepper

Warm oil in a saucepan over low heat, then add garlic and onion; cook until softened. Add all other ingredients; simmer ~15 mins, stirring frequently. (It will taste pretty vinegary straight, but is perfect after it's cooked!)

Baste over desired meat (I did chicken thighs) and refrigerate for 1-3 hrs to let it marinate.

Grill it up!

Thursday, June 30, 2011

5-Minute Fudge

yummo.


 FUDGE!
I may or may not have gained ten pounds from eating two batches of this in four days. (The uncertainty comes from the fact that I refused to get on a scale!) No worries though, it was worth it!

Now, you may think that the name (5-Minute) comes from assembly time, but that's not entirely the case-- it's more like, that's how long it will last before being completely devoured, because it's that deliciously addictive. (I'm only sort of kidding.)

 Can you actually make this in five minutes? Try it and let me know. I probably can't, because I'm perpetually mis-estimating time, BUT it only has four ingredients, and really all you need to do is mix them in a bowl, spread the goop into a pan, and pop that baby into the fridge. (Fridge setting > 5 minutes- it doesn't count!)


THE RECIPE:

1/4 c coconut oil
1 c almond butter (I used raw creamy unsalted)
1/2 c agave
3/4 c cocoa powder

Combine all ingredients, stir until mixed.  Line an 8x8 pan with waxed paper, pour in fudge goo, and place in fridge to set (~30 mins, or until firm), or, if you can't wait- just eat it wet. And then smooth over the area you ate to destroy the evidence! :)

 This stuff is delicious, and super rich. It's kind of like gold, in food form, only chocolate colored instead of gold colored. (Also, you don't have to dig and dig and diggety dig for it.)

Oh, oh, also, this recipe's raw! (provided you use raw almond butter, and whatever cocoa powder you accept as 'raw')

 ~~~~~~~~~~

 Also, I got a new surfboard! Thanks to my mom for a FANTASTIC yardsale find, scoring me my first longboard.

MmmMmmm, beeeeaaaaach....

Thursday, June 23, 2011

Pizza!


drooooooooooooooooooooooooooooooooooooooool....


What goes best with (my just-posted) chocolate chip cookies??? That's right... PIZZA!!!

The quest for quality gluten-free sugar-free yeast-free pizza crust continues. In this version, I've come up with a highly delicious pie-crust-y crust. In other words, it's a bit more dense and less bread-y than the real deal, but still makes a darn good pie. Next time, I'll try adding eggs to make it rise.

THE RECIPE:

1c millet
1/4 c brown rice
1/4 c garbanzo
1/2 c tapioca flour
1 sprinkle stevia
1/2 tsp salt
1/4 tsp guar gum
1 tbs flax meal

~3/8 c light olive oil
1 egg
~1/2 c almond mlk --or until sticky/dough consistency (NOT pie crusty)

spray a large pizza pan with a healthy non-stick spray (or grease manually)
shape into a large circle (makes one ~12 inch pizza)
sprinkle w/ 1/2 tbs flax seed

Top it! I used:

Prego Veggie Smart pasta/pizza sauce
Mozzarella soy cheese, grated
Fresh basil, chopped
Fresh cherry tomatoes, sliced

Spray exposed crust with oil spray.

Bake at 350 for ~20-30 mins, or until cheese melts and crust begins to brown.

Chocochip Cookies

MmmMmmmmmm, choco chips!!!

Amazing chocolate chip cookies: yes, this just happened.

In college, Frist Campus Center used to have the most amazing, soft and gooey chocolate chip cookies- they were by David's Cookies, and were one of the highlights of pre-ACD campus life.

I haven't eaten a genuine chocolate chip cookies since then! In place, I just guzzle Sunspire grain-sweetened chocolate chips straight from the bag. But, a couple weeks ago, I was inspired to make a David's quality ACD-friendly chocolate chip cookie recipe, and because I'm awesome, I succeeded- in taste, texture, and deliciousness!!


THE RECIPE:

4 tbs ghee
4 tbs coconut sugar
2 eggs
1 tsp vanilla

2 tbs oat flour 2
1 tbs millet flour 1
1 tbs tapioca flour
3 tbs teff flour
1  tbs brown rice flour
1 tsp baking powder
1/2 tsp salt
1/4 tsp guar gum
1/4 tsp cinnamon
dusting stevia
2 tbs + 5 tsp flax seed meal

~1/2 10oz bag of Sunspire

Cream eggs and coconut sugar; add ghee and vanilla. Seperately combine dry ingredients and stir well; slowly add dry ingredients.

Cook for ~15 minutes at ~375. Makes about 20 cookies.

Also, I ate them all before remembering to take a plated picture. :)

Tuesday, June 7, 2011

This Guy's Awesome!

and maybe my new hero:

Vegan Black Metal Chef.


Also, I am aware that I bailed on carob month. This is actually the result of several factors which impeded my weekend baking in May. They include: (a) getting poison ivy over a significant portion of my body, spreading to my bloodstream, and forcing me to go on steroids, slash making me sick and incapacitated for two weekends; (b) my birthday occurring the next week, which equalled me going to dinner and staying out late and thus being incapacitated for another Saturday, and (c) Reunions occurring the next and final weekend, taking me away to Princeton.   .... woopsie?   Some day, in the future, it will happen.

Sunday, May 29, 2011

Chocolate Raspberry Truffle Cake

My birthday was a couple weeks ago, and I made myself a cake.


Back in the day, when I wanted to make something truly decadent, I used to look up recipes on the Godiva chocolate website (they have a great gourmet recipe selection). Birthday desserts, boyfriend desserts- Godiva had me covered for all of 'em. So, I decided to take on the challenge of adapting a truly decadent chocolate cake recipe.

Also influencing my inspiration- around this time for the past 4 years was Lawnparties at my eating club in Princeton. This involved an enormous brunch with just about every type of gourmet cake / tart imaginable... and thus resulted in a total deterioration of my diet, for at least a couple days. Obviously I had to make a substitute for that experience, too.

So, I present, the best cake EVER, and of course, gluten-free, sugar-free, dairy-free.
I also submitted this recipe for the Daily Dietribe's Gluten-Free Birthday Cake Challege (awesome).

Chocolate Raspberry Truffle Cake

Preheat oven to 350 degrees. Grease a round (~9 inch?) springform pan.

LAYER 1: Dense Chocolate Cake

¾ c ghee/coconut oil mix
1 c coconut sugar
¼ c light agave          ---> heat on stove until melted and well-mixed; whisk together/stir continuously. Let cool slightly.

2 eggs
2 tsp vanilla    ---> after wet ingredients cool slightly, whisk in eggs and vanilla


2/3 c flour combination: oat, all-purpose GF, brown rice, millet, tapioca
¼ tsp guar gum
½ tsp baking powder
½ tsp salt
½ c cocoa powder    ---> combine dry ingredients in a bowl, then add them to the wet ingredients. Mix well. 
Pour batter into springform pan, and bake ~30 minutes, or until toothpick inserted into center comes out clean. Let cool in springform pan.

 
LAYER 2: Raspberry Layer

2 c rapsberries
1 tsp powdered chia seeds
½ truvia packet
Stevia dusting       ---> combine all ingredients. I used about half frozen raspberries and half fresh raspberries.

LAYER 3: Chocolate Truffle Ganache Layer

1 c canned coconut milk (the more thick/fatty, the better)
10 oz Sunspire chocolate chips

1 tsp vanilla                           ---> heat coconut milk until hot. Pour over chocolate chips, add vanilla, stir until all chips are melted/smooth consistency is obtained. Let cool slightly.

ASSEMBLY:

After cake layer has cooled, (leaving it in spring form pan) spread a thin layer of truffle layer on top (so that raspberry layer won't make cake soggy). Next, spread on raspberry layer. Finally, top with truffle/ganache layer. Place in fridge to chill.


Before serving, remove sides of spring form pan.
Keep chilled before/after serving, or top layer will "sweat."

Hope you enjoy this delicious treat! Everyone's response to it was "I love how buttery the cake tastes!" And I said, "well, there's no butter in it!" Oh, the magic of quality ACD baking! :)


~~~~~~~~

In other news, I just went to my 1st Princeton Reunion! I'm proud to report that ate and drank (aka, didn't drink) well all weekend. Hooray for good life choices!!

Saturday fireworks show-- Goodness gracious, great balls of fire!!

View of the 5th reunion dancefloor from the Grass Knoll, c. 1am Friday Night.

Saturday, May 21, 2011

Meet the Pizzelle

Pizzelle sandwich!
Meet the Pizzelle- traditional Italian waffle cookies. They can be crisp or chewy, sweet or savory, and are typically made with flour, eggs, sugar, and butter/oil.

Carob pizelle ice cream roll.

Dessert pizzelle with strawberry purree and shipped kream.
I had never heard of pizzelle before- and then I found a pizelle maked at a yardsale for 5 dollars! I couldn't resist. These will now be a staple of my regular repertoire, because they made a thin wafer perfect for sandwiches OR dessert toppings. They're just as easy to make as waffles, but provide a lower-carb alternative, since they're thinner and smaller. I did a little research, and whipped up the following all-purpose recipe:

PIZZELLE:

1 egg
1 tbs extra light olive oil
1 tbs millet flour
1 tbs garbanzo bean flour
1 tbs all-purpose gluten free flour
2 tbs brown rice flour
1.5 tsp baking powder
1/2 tsp vanilla
10 drops liquid stevia
1 tbs almond milk
1 tbs ghee

Mix all ingredients together. Consistency should be thicker than waffle batter, but thinner than cookie dough. Place a heaping teaspoon of batter onto each pizzelle circle on hot pizzelle maker, close lid, and bake for ~5-10 seconds for soft, flexible pizelle, or ~30-45 seconds for crispy pizelle. I like soft better for ice cream sandwiches, but crispy better for sandwiches or dessert toppings.


CAROB PIZELLE:

see above, but substitute 1-2 tsp flour for 1-2 tsp carob powder
(Yes, it's my first Carob Month carob recipe!)


What I used them for--
 
Sandwiches with rice cheese, pizza sauce, and spinach
Dessert with strawberry purree, soyatoo whipped cream, and raspberries
Ice cream sandwiches, taco-style (with carob pizzelle and mint carob chip Rice Dream)


Awesome, a whole new food item!