Showing posts with label breakfast. Show all posts

Friday, March 18, 2016

Gingerbread Waffles (GF, vegan)


Yum yum!

DELICIOUS GINGERBREAD BELGIANWAFFLES! Perfect for festive winter mornings. Not pictured: I also made these with a Disney Frozen snowflake-shaped Belgian waffle maker that I got for Christmas, and it was phenomenal.

WAFFLES:

1 cup teff flour (or use some all purpose GF)
¼ cup coconut sugar
1 teaspoon baking powder
1 teaspoon cinnamon
1 teaspoon ginger
½ teaspoon nutmeg
¼ teaspoon allspice
¼ teaspoon clove
¼ teaspoon xanthan gum (optional)
¼ teaspoon salt
⅓ cup coconut milk
1 large egg (or 1 flax egg, which is what I used)
2 teaspoons vanilla extract
3 tablespoon agave nectar
3 tablespoon melted coconut oil
      ---> combine ingredients, waffle-ize in your favorite waffle maker (Belgian worked very well)

GLAZE: 

1 cup coconut sugar (powdered, if you want to be picky about consistency)
1 tablespoon coconut milk
1 tablespoon lemon juice
¼ teaspoon vanilla extract
     ---> whisk together. You can also mix these ingredients by taste.

Enjoy!

Tuesday, April 1, 2014

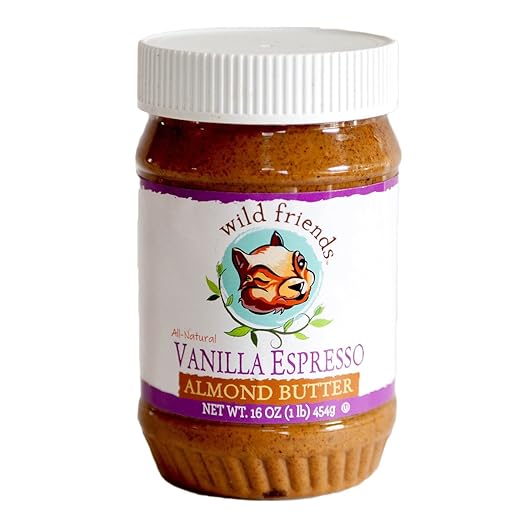
Things that are Awesome: Wild Friends Vanilla Espresso Almond Butter

It's creamy almond butter, sweetened with agave, and enhanced with vanilla and tiny flecks of espresso powder.  If eating this isn't a brilliant start to any morning, I don't know what is.

Try it on everything from waffles to cookies to ice cream.  Or straight out of the jar.  Did I mention it has a WINKING SQUIRREL on its label? because that just makes it infinitely better.

Eat this now.


Thursday, April 12, 2012

The Sticky Bun Experience


 Also known as, How I Spent My Easter:


Sticky Bun: aka, giant brick of sweet, rich, caramely decadence.

I made Pecan Sticky Buns, invented from a recipe in April's Bon Apetit magazine.  Problem is, they somehow ended up taking half the day to make!  This was pretty much due to a few "mishaps" that occurred along the way.  In the future, I will also make everything the night before, roll them out, and then will only need to slice and bake them in the morning.


At any rate, these turned out sinfully rich, sweet and delicious.  Since I didn't use yeast in the recipe, they have a more flakey than doughy consistency, but still fine nonetheless. 

This recipe has three parts: the dough, the filling, and the topping/glaze.  Before I go into the making of them, let me explain the "mishaps" that I had. 

1. First of all, gluten-free flour must absorb less water than normal flour. (Maybe? Let's blame it on that?) - I added less milk than called for to my batter at the last step, yet still turned it to a sticky, unrollable mess.  So, I had to keep adding more and more flour....  I was already making a double recipe, so this nearly made my mixer bowl overflow.  (It also prompted some delirious song... "25 gallons of sticky bun dough, 25 gallons of dough.... add some flour, mix it around, 26 gallons of sticky bun dough.....")  After adding about a cup, I gave up, threw it in the fridge, and it ended up fine after chilling.

2. Second major issue-- Bon Apetit recipe calls for 1 cup of the glaze to be poured into the pan before putting the raw buns in, before cooking.  I somehow missed the "1 cup" part, so I dumped the whole pot in.  This led to sticky buns swimming in a pool of caramel sauce.  When I realized my mistake, I tried to pour some out.... this did not end well either. (Actually it was fine- but sticky buns were still baked in WAY more glaze than necessary!) - So that one definitely changed the final product.

The moral of the story is, they're still delicious, even if you mess up a little. (Or "improvise!")

Without further ado....

THE RECIPE:

DOUGH:
1/2 c millet flour
1/2 c brown rice flour
1/2 c tapioca flour
1/2 c potato starch
3/4 c all-purpose GF flour
1.5 tsp guar gum
2 tsp baking powder
5 tbs coconut sugar
1 tsp sea salt                       --> combine dry ingredients, stir to mix

2 large eggs                        --> break into a cup, whisk until smooth
~1/3 c almond milk-- or less!
1/4 c ghee
1/4 c coconut oil  (soft, but not melted)

Place dry ingredients in the bowl of a stand mixer fitted with a dough hook. (Dough hook is probably optional, especially since we're not using a yeast dough... but I used one anyway)  Gradually add all eggs, and about 1/4 c almond milk. Add milk slowly until dough is moist enough, but not too wet to roll.  Mix in butter a little bit at a time.  Mix on medium speed for ~5 minutes.  Place in refrigerator to chill (2-3 hrs).

FILLING:
1/4 c ghee
1/4 c coconut oil  (soft, not melted)
1/2 c coconut sugar
ROLL OUT!
3/4 tsp cinnamon
1/2 tsp nutmeg
1/2 tsp salt

Mix all ingredients using an electric mixer on high speed, beating until light and fluffy, 2-3 mins.  Set aside.

TOPPING/GLAZE

1 3/4 c chopped pecans, toasted     (toast on a cookie sheet in oven, if not pre-toasted: 10-12 mins at 350)
1/4 c coconut oil
1/4 c ghee
3/4 c coconut sugar
1/3 c agave
2/3 c almond milk + 2 tbs soymilk powder + 1/8 tsp guar gum  (= "heavy cream" substitute!)
1/4 tsp salt
1/4 tsp finely grated orange zest (optional- I did one batch with, one without-- both great!)

Melt oil/ghee in a small heavy saucepan over medium heat. Stir in all other ingredients. (Coconut sugar will probably separate out/turn tar-like... this is okay! Proceed!)  Bring to a boil, reduce heat to medium, and simmer for 3-4 minutes.  (MAGIC!) Sauce should be uniform, glossy, and smell (/taste) like caramel. :)
What NOT to do: pour entire pot of glaze into pan.

ASSEMBLY:
Pour ONE CUP :) of glaze into a 8x8 baking pan, and tilt to coat sides. Set aside the rest for later use.  Sprinkle 1/2 c toasted pecans over bottom of baking pan, and let cool.

Roll out dough- I recommend between 2 sheets of waxed paper, or between two silicone rolling sheets.  Either way, flour surface liberally (I used brown rice flour.) Roll into a 12"x16" rectangle, about 1/4" thick, with the long side facing you.  Spread the filling over the rectangle, leaving a 1" plane border on the edge farthest from you (so it doesn't goo-out post-rolling!)

Sprinkle 3/4 c chopped pecans over filling.

Starting with the long edge closest to you, roll up the dough, trying to tighten as you go.  Use a metal knife/spatula to help free it if necessary.  Pinch long seam together when rolled. Pat open ends to make them flat (un-tapered). Arrange log seam-side-down.

Buns swimming in glaze.... yummo!
Use a knife to slice log into 9 pieces (buns)... or more if you want lots of shorter ones! (but then you will need more pans... possibly with more glaze in them....)  Turn buns cut-side up, and pat top to flatten slightly.  To make a bun more round in shape, cup it in floured hands, and gently push and turn it in a circular motion. 

Place buns in prepared pan, evenly spaced, and preferably not touching.

Preheat oven to 350, with a middle rack available. Whisk one egg with 1/2 tsp water in a bowl, and brush tops of buns with egg wash.  Bake for ~50 minutes, "rotating pan halfway through and tenting with foil if browning too quickly" (--yeah right Bon Apetit, I did neither of those two things).  Buns should be golden-brown, and filling (/glaze goo) should be bubbling.

Let cool for 5 minutes, then spoon remaining glaze over them.  Sprinkle on remaining 1/2 pecans, then let cool completely.  --Bon Apetit also says to lightly sprinkle sea salt over them. I forgot to do this, but I think it would be good! --> so let's say sea salt optional.

THE END!

Outta the oven.  Maybe more like Sticky-Bun-Loaf... but delicious all the same.


For me, the experience of making these was equally important as the outcome.

(Sadly, I can barely eat the outcome, as they're just so darn sweet and rich! ..and probably calorie rich too... oh well!)

Oh oh and you know what my favorite part was??? Making the glaze taught me that coconut sugar does indeed caramelize, and if you boil it with almond milk./agave, it WILL melt! (contrary to its low-heat tar-like behavior!) Yay!

Sunday, March 25, 2012

Waffle Cookies! (Wookies?)

Waffleization #1: Chocolate Oatmeal Waffle-Cookies!

Look like waffles, taste like cookies. True Waffleization.

Waffleized cookies are cookie batter cooked in a waffle iron.  I whipped up some chocolate-oatmeal batter, and popped it in my belgian waffle maker... instant waffle-cookies! (wookies?)

THE RECIPE:

1 c flour  (1/4 all-purpose GF, 1/4 brown rice, 1/4 c millet, 1/4 c GF oat)
3/4 c GF oats

1/2 tsp baking powder
3/8 tsp salt
1/4 tsp cinnamon
1/8 tsp nutmeg
3 Tbs cocoa powder
1 Tbs cacao nibs (optional)

1/4 c coconut oil
1/4 c agave
1/4 c coconut sugar
1 egg
1/2 tsp vanilla

Combine dry ingredients in a bowl, and separately whisk together all wet ingredients in a large bowl. Add dry ingredients, and stir/beat until well combined. (I did it by hand using a wooden spatula/paddle thingy.)  The batter should be cookie-consistency: Holds its form, but still moist/a little sticky.

Fire up the waffle iron! I used a medium-high setting, but still needed to watch them carefully.  It's a balance between cooking them long enough that they're firm enough to be removed in one piece, but also not cooking them too long/too high that the outside burns.  A little bit of dark toastiness is fine, and to be expected. The inside will still be gooier than the outside, which is also fine (and delicious)!

Scoop on blobs of the batter, and flatten them slightly.  I chose not to make them full-waffle sized, but any size should work.  Since I didn't fill the griddle, my "green light" was going off before the waffle-cookies were truly all the way done... so as I said, I had to check them to see when they were really done.

Overall, this worked very well! They taste just like normal cookies, but have the added benefits of being (a) waffle-shaped (thus possibly still passing as breakfast), and (b) TWICE AS BIG as normal cookies (thus allowing you to eat twice as much). :)

SUCCESS! Wookies rock.

Monday, October 31, 2011

Apple Cider Donuts with Apple Cider Syrup

MmmMMmm... pre glazed.

Perfect for the fall.  TRUTH: I ate 48 mini donuts in 3 days.  Pretty easy to make, and the result has a true cake donut crumbly-but-melt-in-your-mouth consistency.  Top them with cinnamon coconut-sugar, or drizzle with home made apple cider syrup.... or both!


 THE RECIPE:

1/3 c brown rice
1/3 c teff flour
1/3 c tapioca Flour
1 c millet flour            (totals 2c GF flour)

1 tsp guar gum
1 tbs baking powder
½ tsp salt
½ tsp nutmeg (or more to taste)
½ tsp cinnamon (or more to taste)

2 tbs applesauce
¾ c apple juice
5 (/7, or scant ¼ tsp) drops apple cider vinegar
3/4 c coconut sugar          
2 tbs agave
2 tbs coconut oil, melted
½ tsp vanilla extract
1 egg

Combine dry ingredients. Combine wet ingredients. Make sure coconut oil is melted—place in hot water bath/heat gently on stove if not. Mix wet into dry.

Preheat donut maker; fill donut wells—DO NOT overfill, these WILL rise well. To top, spray with sprayable coconut oil, then sprinkle with cinnamon+coconut sugar. For a sweeter taste, drizzle with apple cider syrup (and cinnamon-coconut sugar, if desired). The syrup does take away a bit from the delicate donut taste, though - so take your pick!


Apple Cider Syrup:

1 gallon apple cider

First, measure 2.5 cups cider into a large (at least a gallon) pan, and note the liquid level. Add the rest of the cider. Boil for approximately 5 hours, stirring frequently (especially at the end as it thickens), until volume is reduced to 2.5 cups. Pour into sterile (boiled) glass jars for storage. Keep refrigerated. Syrup will thicken as it cools.

Boil it down!
As it begins to thicken (~5 hrs) it will begin to froth! Exciting!


Saturday, May 21, 2011

Meet the Pizzelle

Pizzelle sandwich!
Meet the Pizzelle- traditional Italian waffle cookies. They can be crisp or chewy, sweet or savory, and are typically made with flour, eggs, sugar, and butter/oil.

Carob pizelle ice cream roll.

Dessert pizzelle with strawberry purree and shipped kream.
I had never heard of pizzelle before- and then I found a pizelle maked at a yardsale for 5 dollars! I couldn't resist. These will now be a staple of my regular repertoire, because they made a thin wafer perfect for sandwiches OR dessert toppings. They're just as easy to make as waffles, but provide a lower-carb alternative, since they're thinner and smaller. I did a little research, and whipped up the following all-purpose recipe:

PIZZELLE:

1 egg
1 tbs extra light olive oil
1 tbs millet flour
1 tbs garbanzo bean flour
1 tbs all-purpose gluten free flour
2 tbs brown rice flour
1.5 tsp baking powder
1/2 tsp vanilla
10 drops liquid stevia
1 tbs almond milk
1 tbs ghee

Mix all ingredients together. Consistency should be thicker than waffle batter, but thinner than cookie dough. Place a heaping teaspoon of batter onto each pizzelle circle on hot pizzelle maker, close lid, and bake for ~5-10 seconds for soft, flexible pizelle, or ~30-45 seconds for crispy pizelle. I like soft better for ice cream sandwiches, but crispy better for sandwiches or dessert toppings.


CAROB PIZELLE:

see above, but substitute 1-2 tsp flour for 1-2 tsp carob powder
(Yes, it's my first Carob Month carob recipe!)


What I used them for--
 
Sandwiches with rice cheese, pizza sauce, and spinach
Dessert with strawberry purree, soyatoo whipped cream, and raspberries
Ice cream sandwiches, taco-style (with carob pizzelle and mint carob chip Rice Dream)


Awesome, a whole new food item!

Monday, April 25, 2011

Orange Sweet Rolls: Pillsbury Style


These are one of my favorite things ever! Easy to make in advance, then pop in the oven for a special brunch. I slightly improved the dough from my cinnamon rolls, and topped with a delicious fresh orange glaze.

THE RECIPE:

The Dough:


½ c tapioca flour
½ c potato starch
¾ c arrowroot powder
¼ cup brown rice flour
1/4 c millet flour
½ tsp salt
1 ½ tsp guar gum
2 tsp baking powder            
1 tiny stevia-scoop stevia

3 tbs coconut oil (melted)
2 ½ tbs agave
1 tsp vanilla
2 eggs                           --> combine wet ingredients; whisk in egg; add wet to dry


1/4 c almond milk    -->  add milk slowly, until it is dough consistency (a little sticky is ok.)

If dough is too sticky, dust with brown rice flour until it does not stick to your hand/spatula when touched.

--> Tape a sheet of waxed paper down onto a counter/table. Dust with brown rice flour. Place dough in the center, and use a (floured) rolling pin to roll out to ~¼ (or thinner) inch thick rectangle.


Filling:
2 tbs coconut oil (softened)
4 tbs coconut sugar
2 tbs cinnamon
2 tbs agave                        
                   ....or basically any combination of the above ingredients (leaving out the oil works fine too!)

--> Wisk together all ingredients until combined. Use a rubber spatula to spread filling over entire rectangle of dough.

Untape the waxed paper under the sheet of dough. Begin rolling dough “hot-dog style” (AKA, roll the long side, to make a thin, long roll) by lifting the waxed paper and gently coaxing the dough into a tight roll. Since the part of the roll is the tightest, starting it is the trickiest, and after that you can just left the waxed paper and let the log of dough roll on its own.

If making the dough in advance, tape the waxed paper around the log of dough, put plastic wrap around the open ends, and place in the fridge overnight. When ready to bake them, place the roll on a cutting board, and slice into ~1-inch thick rounds. Arrange them evenly spaced in an 8-inch round cake pan. Dough will expand as it cooks, so it's fine if there's extra space in the pan.

Heat oven to 350, and bake for ~30 minutes. Dough will still be soft when it comes out (don't bake until it's hard! 30 minutes max should do it). After removing from the oven, let cool in pan for ~5 minutes (ie, while you make the glaze!).

Glaze:

1 orange
1 tbs agave (preferably "light" agave)
1 tsp ghee, softened
1 tsp chia seeds (to help thicken it)
orange zest (from the rind) to taste (~1/8 tsp)
dash salt (if needed)               ----> puree in blender/food processor (Magic Bullet!)

Let glaze sit for a couple minutes to let the chia seeds work their thickening magic. Then, spread over all rolls in the pan.

Dig in and enjoy the anti-pillsbury deliciousness! (no disrespect to my guy the Doughboy)


          <

Wednesday, April 13, 2011

Easter Treats, Part I: Bunny Cake and Bebe Eggs


Bunny Cake!

Starry approves.
Easter Special- for the Spunky Coconut Easter round-up. Stay tuned for more as Easter draws nearer!

The traditional bunny cake made gluten-free, sugar-free, dairy-free. To make it look a little more authentic (aka furry), press shredded (unsweetened) coconut onto the frosted bunny.

I made this from a modified vanilla-bean cake- and marbled together the traditional yellow batter with a lavender batter dyed from pureed blackberries.

THE RECIPE:

2 cups cooked and drained white beans  ---> puree in high power blender (Vitamix)
1/4 cup coconut oil, melted
1 tsp vanilla
~2 tiny-stevia-spoon-scoops powdered stevia
1 tbs agave
5 egg yolks -----> add, puree well

1/4 c flour blend: (millet + garbanzo + tapioca + oat) OR coconut flour (I ran out!!)
2 tsp baking powder----> mix all dry ingredients well, then add to wet and puree again


**pour half of batter into a separate bowl. Then, add ~1/4 c blackberries to dye remainder lavender/purple.


Beat the remaining 5 egg whites until still peaks form (add cream of tartar to help maintain them). Divide egg foam into two bowls; fold one batter color into each of them.


Grease one 8-inch circular cake pan, then like bottom with waxed paper, and grease it.

Start with the color of batter that you have more of: pour a thin layer into the bottom of the pan. Then dollop large blobs of the minority color on top. Use a butter knife to swirl the colors together. Repeat layering, dolloping, and swirling until all batter is used up. Be careful not to overfill pan (leave some room for rising)- if you have extra, make a few cupcakes.


Bake for ~30 minutes at 350 C.


Preparing Bunny shape:


1. Remove cake from pan (pull of wax paper from bottom) and cut in half. Frost flat, under-side of both halves.

2. Stand up two half-circles next to each other, letting the two frosting sides stick together.

3. Cut a wedge out of the top-front to separate bunny's face and body.

4. Frost!


FROSTING:

1/2 c powdered erythritol*
2 tbs ghee, sort
2 tbs coconut oil, soft
1 tbs arrowroot powder (to add volume and cut sweetness- add more/leave out as desired)
2 strawberries, pureed almond milk (add slowly to make it the right consistency)
2 tbs powdered coconut (or flaked, or coconut flour if desired)

* Make your own powdered erythritol! Put ~1/2 c granular erythritol into the Magic Bullet small cup, and pulse for about 20 seconds with the crossblade. BAM-- powder!

To make frosting, blend all ingredients in the magic bullet.

Enjoy your bunny! Give it a face with grain-sweetened chocolate chip eyes, and a strawberry-tip nose. Whiskers can be toothpicks (if you're lazy like me), or carrot/zucchini spliters to be a bit more creative. My ears were pink index cards cut-to-shape... maybe you can come up with something better (edible) for those too!


~~~~~~~~~~~~~~~~~~~~~~~~~~~~~~~~~~~~~~~~~~~~~~~~~~~~~~~~~~~~~~~~


Feature #2: BEBE EGGS


Easter is great. Dying easter eggs is also great. Unfortunately, having 1000000 leftover hard-boiled eggs is not great. Here, I present my family's traditional solution to this epic dilemma.

(Bebe eggs? (almost "Baby" eggs). Why are they called that? I have no idea. They just are!)


Mmm, bebe eggs hot in the pan!

 Basically, Bebe eggs are mashed up, sauteed/re-fried hard boiled eggs. Also makes great fun to make these easter morning! On my childhood easter mornings, we made a tradition of playing catch with each egg- waiting until we dropped it to break it and add it to the pot (and eventually just more-or-less pegging them at each other...).

THE RECIPE:

Lots of hard-boiled eggs! ---> mash with a potato-masher (or a fork- but it will take you way longer)
Ghee
Salt
Pepper
*optional: for more savory eggs, add a bit of onion powder/garlic powder

Melt some ghee on a skillet over medium heat-- add eggs and seasonings. Cook until just-browned, stirring frequently.

Eat em all up for Easter breakfast!

~~

Stay tuned for more easter treats to come: OUTSIDE COOKIES, RAINBOW TRUFFLES, and ORANGE BREAKFAST ROLLS (Pillsbury style!).


Wednesday, March 23, 2011

It's.... INTERNATIONAL WAFFLE DAY!!! (March 24)


and it's time to celebrate!  (I'm posting this a bit in advance, to give ample inspiration for waffley breakfasts tomorrow.)

What a wonderful week. A supermoon, the first day of spring, warm weather, two best friends' birthdays, and International Waffle Day on March 24.

Not gonna lie, I've been waffling all week in anticipation. Monday night I made cinniteff waffle sandwiches with pizza sauce, cheeze, and mixed greens on them. I also came to the discovery that (at least in my belgian waffle maker, with cinniteff waffles) thinner batter makes soft, flexible, moister and lighter waffles, whereas thicker batter (which is what I usually do for breakfasts) makes crispy belgian-style waffles. I liked the lighter option for dinner, when I want proportionally more protein and less carbs. So keep that in mind!

Also, I ran out of teff flour Monday. Which led me to create the above-pictured Goldi-squares Stairway to Waffleheaven #Winning Waffles. We'll just call them #WinningWaffles for short..... (TIGERBLOOD!!!!)

They pretty much are amazing. Light, faintly sweet but still neutral flavor allows for unlimited possibilities. Such as:

PIZZA WAFFLE!!!! huge success. I used Bridgford Turkey Pepperoni, and Prego VeggieSmart sauce. yum.


OMG  it's a WAFFLEDONUT. okay not really, but that's what it tastes like. Just sprinkle on top: Organic cocoa powder, coconut sugar, and shredded coconut. And it tastes like a chocolate powdered sugar donut! Slash some kind of intensely amazing pastry delicacy.


So, for the substrate behind all this madness:

THE RECIPE:

1 egg
1 tbs extra light olive oil  ---> whip together until a bit frothy
up to 3/4 c almond milk
1 tsp vanilla
5 drops stevia
1.5 tbs millet flour
1.5 tbs garbanzo bean flour
1 tbs Bob's Red Mill All-Purpose GF Flour
1 tbs coconut powder (ie, finely shredded coconut/coconut flakes)
scant 1/8 tsp salt
1/2 tsp baking soda     ----> mix all together, pour into [belgian] waffle iron and WAFFLE IT UP!

Ghee (or coconut oil) it after it's off the iron.


#WINNING

Sunday, February 6, 2011

Happy World Nutella Day!


February 6 is World Nutella Day! Obviously I had to celebrate. I whipped up some homemade nutella using my Magic Bullet, and ate it on clementine slices.

THE RECIPE (nutella):

1/4 c hazelnuts
1 tbs almond milk (or water)
1 tsp vanilla
1 tbs raisins
dash salt
1 tbs cocoa powder
1/2 tbs agave nectar, /to taste

All proportions can be adjusted to taste. Blend until smooth in a food processor. (I was lazy and left mine chunky)


Saturday, February 5, 2011

Raw Blueberry Banana Parfait


Another instant magic bullet delight.

THE RECIPE:

Banana layer:
1/2 banana
2 tbs walnuts
1 date
1/2 tsp vanilla
dash salt   ----> purree

Blueberry layer:
handful of blueberries
squirt of agave   ----> purree

Layer in a small bowl or glass. Use a knife to draw lines down the sides of the dish, letting the top blueberry layer dip down into the banana layer for a pretty effect. Garnish with chopped walnuts.

Monday, January 17, 2011

Chocolate Covered Waffle Sticks


Chocolate covered Waffle sticks, featuring the Sweet 'n' Savory Challenge ingredient of the month: Coconut Oil!


Coconut oil is one of my kitchen staples. Great for baking, great for a butter-substitute, it's all-around delicious and healthy. Plus, it has the unique property of a melting point around 76 F. This means that at warm temperatures, it is a liquid just like olive oil-- but at cold temperatures (aka, now) it is completely solid.

With all of the recipes in which I use coconut oil, for this month's challenge I wanted to pick a recipe that exploits the oil's high melting point. Really, no other oil can be substituted for this chocolate coating.

So, I present to you: Chocolate Covered Waffle Sticks-- a breakfast in dessert's clothing.  (...which obviously still makes it a breakfast.... right??)

Any type of waffle will due for dipping in this delicious chocolate sauce, but I opted for my trusty Cinni-Teff waffles.


THE RECIPE:


Cinni-Teff Waffles:

1 egg or egg substitute equivelent
1 tbs extra light olive oil                        ----> whip
1 cup milk substitute (rice/soy/almond/coconut)
1 tsp vanilla (alcohol-free)                    ----> mix
3/4 cup teff flour
1/4 cup cinnamon (or more/less to taste... I like lots!)
1 tsp baking powder                           -----> mix
1/8 tsp salt

Bake on high in (Belgian) waffle iron, then let cool. (Try not to eat them all at this stage...) These proportions make about 4.5 x 5 inch waffles.

Chocolate Dipping Sauce:

3 tbs coconut oil
3 tbs cocoa powder
1 tsp vanilla
2 tsp agave nectar (or to taste)

Melt coconut oil in a small pan over low heat. As soon as it is melted, remove from heat. Stir in cocoa powder, vanilla, and sweeten to taste with agave. Let cool until mixture just begins to thicken. To speed the process, luke-warm pan of chocolate can be placed in the fridge for short periods of time. Just be sure to check/stir it frequently to prevent the coconut oil from hardening prematurely.

Assembly:

Slice waffles into strips, or alternately cut bite-sized peices around each square. When sauce has begun to thicken, dip each piece into the chocolate sauce. If chocolate sauce thickens too much for dipping, spread with a knife onto waffle. If desired, roll in shredded coconut, nut pieces, or other small delicious item. Place on a waxed paper-lined plate/cookie sheet to harden. To speed hardening, place cookie sheet in fridge.


Long long ago, I used to eat chocolate covered waffles from Whole Foods. They were delicious. So are these. Really, absolutely the same. Which = success!

Also: in nine weeks, I am incredibly excited to report that I will be visiting a friend in Trinidad for Carnival 2011. This will involve parading through the streets in this costume, which will require looking phenomenal, which will require cutting back on the dessert (and all other food...) for the next nine weeks. Which, in turn, requires me to not bake any more desserts for quite some time. So, be prepared for a temporary dessert-hiatus-- yet I will try to post some veggie/entree recipes.

Anyway. Chocolate covered waffle sticks? These aren't desserts! They're just waffles. Good old, breakfast-certified, waffles.


Saturday, November 27, 2010

Cinnamon Rolls: Pillsbury Style

Get ready for some food porn:


So, every year for holidays (Thanksgiving, Christmas, Easter) I would wake up to the delicious treat of Pillsbury cinnamon (/orange) rolls. They were fast to make in the morning, just requiring removal from their cylindrical cardboard pop-tube, and arrangement into a round pan. Then we'd pop them in the oven, and in to time we were spreading the accompanying frosting on top, then devouring the entire pan of them.

Well. I haven't eaten one of those in years.
But this time I was determined to not go without.

Thus, I have created the ultimate cinnamon roll recipe. It can be prepared ahead of time, and then the tube of dough can be chopped into individual rolls the morning-of, just like with the old Pillsbury's.

So let's make a list-- or even better-- a VEN DIAGRAM
Figure 1.1: The only difference between my cinnamon rolls and Pillsbury's is that mine are healthy and theirs are not (and make dinosaur noises, apparently)


 Here we go:


THE RECIPE:

The dough:

½ c tapioca flour
½ c potato starch
¾ c arrowroot powder
¼ cup brown rice flour
½ tsp salt
2 ½ tsp guar gum
¼ tsp baking soda
2 tsp baking powder                  --> combine dry ingredients

3 tbs coconut oil (melted)
2 ½ tbs agave
1 tsp vanilla
10 drops stevia
1 egg                           --> combine wet ingredients; whisk in egg; add wet to dry

½ c coconut milk    -->  add coconut milk slowly, until it is dough consistency (a little sticky is ok.)

If dough is too sticky, dust with brown rice flour until it does not stick to your hand/spatula when touched.

--> Tape a sheet of waxed paper down onto a counter/table. Dust with brown rice flour. Place dough in the center, and use a (floured) rolling pin to roll out to ~¼ inch thick rectangle.


Filling:

2 tbs coconut oil (softened)
2 tbs ghee (soft)
4 tbs coconut sugar
2 tbs cinnamon

--> Wisk together all ingredients until combined. If oils are completely melted, place bowl in freezer for a few minutes until it is a spreadable paste consistency.

Spread filling over entire rectangle of dough.

Untape the waxed paper under the sheet of dough. Begin rolling dough “hot-dog style” (AKA, roll the long side, to make a thin, long roll) by lifting the waxed paper and gently coaxing the dough into a tight roll. Since the part of the roll is the tightest, starting it is the trickiest, and after that you can just left the waxed paper and let the log of dough roll on its own.


This dough gave me ZERO problems, and it rolled up like an AMAZING dream.

I made these the night before I wanted to eat them for breakfast, so at this stage, I just taped the waxed paper around the log of dough, put plastic wrap around the open ends, and stuck it in the fridge overnight. (You probably could freeze them for an extended period of time too.)


Roll of delicious potential, just waiting to be released in the oven!


When you’re ready to cook them, unwrap the log and place roll on cutting board. Slice inch-thick rolls, and place into an 8-inch round cake pan.


Bake in the oven at 375 for ~25 minutes. Meantime, make the glaze!:


Glaze:

1 tbs erythritol (powdered if you have it; I used granular)
1 tbs almond meal
1 tbs coconut milk
1 tsp vanilla
1 tsp vegetable glycerine

--> Whisk together all ingredients. This amount will just-cover pan of rolls; if you want a more substantial covering, double recipe.  And, O.M.G. this stuff takes like Cinnabon. Or rather, it tastes like Cinnabon smells at the mall, because I’ve never actually eaten a Cinnabon.

When rolls come out of the oven--  (they should have just a HINT of golden-ness on top from cooking; they don’t really change colors when done, but should have a firm crust on top to the touch) -- pour glaze over rolls.

Before Baking.

After Baking.

After Baking, with Glaze!


EAT!!! Phen.o.men.AL!!! :):):)

Yum! All gone.